Stop Virtualizing Your Disks: The Engineering-Grade Guide
You didn’t leave the VMware ecosystem just to build a fragile house of cards on Proxmox. But if you are following the generic “TrueNAS on Proxmox” tutorials floating around the web, that is exactly what you are doing. Most guides tell you to “pass through” individual physical disks using the command line (`qm set`).
Don’t do it.
Here’s the blunt truth: Passing individual disks preserves the virtualization layer. The hypervisor still sits between your ZFS file system and the physical platter. This means TrueNAS cannot see the drive’s serial number, cannot access SMART data properly, and crucially cannot execute the low-level error recovery commands that save your data during a sector failure. It works fine on Day 1. It fails catastrophically on Day 100.
In this guide, we aren’t just installing software. We are going to engineer a storage solution. We will pass the entire LSI HBA Controller through to the VM, giving TrueNAS direct, bare-metal access to the drives. We will also fix the thermal issues most people ignore and solve the bootloader nightmare that traps ZFS users.
⚡ HIGH RISK HARDWARE MODIFICATION:
- Boot Loop Risk: Ensure your Proxmox OS drive is NOT attached to the target HBA. Blacklisting the driver for the OS drive will render the system unbootable.
- Bricking Risk: Flashing firmware carries inherent risks. A power loss during the
sas2flashprocess can brick your card permanently. Use a UPS if possible. - Backup Required: Do not proceed without a backup of your VM configurations and critical data.
1. The Hardware Foundation: Selecting Your Weapon (The LSI Bible)
🛑 STOP: Where is your Proxmox OS installed?
Before you blacklist drivers or pass through the card, you must verify one thing:
Your Proxmox Boot Drive (SSD/NVMe) MUST NOT be connected to the HBA card you are passing through.
If your OS drive is plugged into this LSI card, and you follow Step 2 (Blacklisting), your server will fail to boot because Proxmox will lock itself out of its own hard drive. Connect your OS drive to a motherboard SATA port or use an NVMe slot.
The heart of this build is the LSI Host Bus Adapter (HBA). But not all cards are created equal, and the market is flooded with “gotchas” that can throttle your performance or overheat your system.
What is an LSI HBA?
Simply put, an LSI HBA is a PCIe card that acts as a funnel. It takes the storage traffic from your hard drives and pipes it directly to the OS, bypassing the motherboard’s often-inferior SATA controllers. For ZFS, this transparency is non-negotiable.
| Generation | Chipset | Interface | The Verdict |
|---|---|---|---|
| SAS2 | LSI 9211-8i (SAS2008) | PCIe 2.0 x8 | Good for HDD. Avoid for SSDs (Bottleneck at ~3.2GB/s). |
| SAS3 | LSI 9300-8i (SAS3008) | PCIe 3.0 x8 | Required for SSDs. Supports 12Gb/s SAS. Warning: Runs extremely hot. |
| Tri-Mode | LSI 9400-8i (SAS3408) | PCIe 3.1 x8 | Overkill. Supports NVMe, but driver maturity in BSD/Linux varies. Expensive. |
The “Silent Killer”: Thermal Throttling
I learned this the hard way during a build in 2023. I installed an LSI 9300-8i into a standard mid-tower case. It worked perfectly for 20 minutes. Then, during a heavy ZFS scrub, drives started dropping offline randomly.
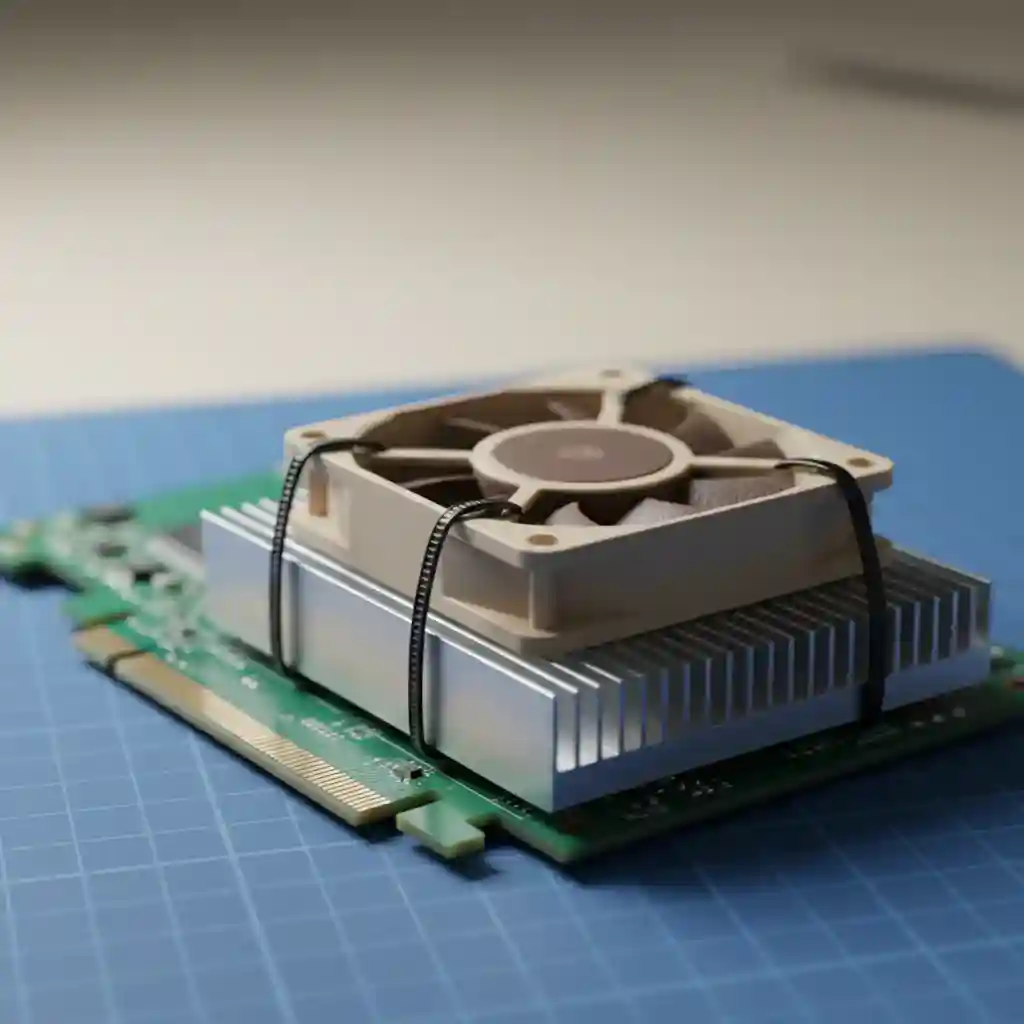
Here’s the thing: LSI cards are designed for 1U enterprise servers. The official Broadcom SAS 9300 Datasheet explicitly mandates 200 LFM (Linear Feet per Minute) of airflow. In your quiet homelab case, that card is baking at 90°C+. When it hits its thermal limit, it shuts down, corrupting your data transfer.
The Fix (The Zip-Tie Mod): Never install an LSI 9300 series card without active cooling. Buy a Noctua NF-A4x10 FLX (40mm fan) and use two small zip ties to secure it directly onto the LSI heatsink. It drops the temperature from 90°C to 45°C instantly. It’s ugly, but it saves data.
How to Spot a Fake
The “Art of Server” has documented this extensively. The secondary market is a minefield of counterfeits. If the PCB traces don’t look like copper, or if the heatsink is attached with flimsy plastic push-pins instead of screws, you likely have a knock-off. These fakes often use lower-grade silicon that fails under sustained ZFS loads.
2. The “Bootloader Detective”: Preparing the Host
This is where 90% of tutorials fail you. They tell you to edit /etc/default/grub, run update-grub, and reboot. You do it, and nothing happens. IOMMU stays disabled.
Why? Because Proxmox has changed. According to the Proxmox Host Bootloader documentation, systems installed with ZFS as the root file system default to systemd-boot, completely ignoring GRUB configurations. Editing the GRUB file on a systemd-boot machine is like screaming into the void—the system ignores it.
Step 1: Identify Your Bootloader
Stop guessing. Run this command in your Proxmox shell to see who is actually in charge:
[ -d /sys/firmware/efi ] && echo "UEFI Mode" || echo "Legacy Mode"If it says “UEFI Mode” and you are running ZFS root, you are almost certainly using systemd-boot.
Step 2: Enable IOMMU (The Correct Way)
For Intel CPUs, we need intel_iommu=on. For AMD, it’s usually automatic, but amd_iommu=on doesn’t hurt.
Scenario A: The GRUB User (Legacy/Ext4)
Edit /etc/default/grub:
GRUB_CMDLINE_LINUX_DEFAULT="quiet intel_iommu=on iommu=pt"Then run: update-grub
Scenario B: The Systemd-boot User (UEFI/ZFS) PROBABLY YOU
You must edit /etc/kernel/cmdline. This file should be a single line of text.
root=ZFS=rpool/ROOT/pve-1 boot=zfs intel_iommu=on iommu=ptCRITICAL: After editing, you must sync the kernel. Do NOT run update-grub. Run this instead:
proxmox-boot-tool refreshStep 3: Isolate the Card (The Blacklist)
Linux is helpful. When it sees an LSI card, it loads the mpt3sas driver to use it. We don’t want the host to touch that card. We want it to remain “dumb” so we can pass it to the VM.
We need to bind the card to the vfio-pci driver. First, find your card’s PCI ID:
lspci -nn | grep LSIYou’ll see something like [1000:0097]. Add this to your vfio configuration:
echo "options vfio-pci ids=1000:0097 disable_vga=1" > /etc/modprobe.d/vfio.conf
echo "blacklist mpt3sas" > /etc/modprobe.d/blacklist.conf
update-initramfs -u
reboot
3. The Firmware Gauntlet: UEFI vs. Legacy
You bought a card on eBay. It claims to be in “IT Mode.” Do you trust it? No. Trust needs verification.
Most people try to flash these cards using the old DOS tools (`sas2flsh.exe`). If you have a modern motherboard, this will fail with the infamous “Failed to initialize PAL” error. Modern UEFI boards simply cannot execute the legacy commands.
The Solution: The UEFI Shell
You need the sas2flash.efi tool. Here is the workflow that actually works on modern gear:
- Put
sas2flash.efiand the IT mode firmware (`2118it.bin` for SAS2, etc.) on a FAT32 USB stick. - Boot your computer into the UEFI Shell (usually an option in the BIOS boot menu).
- Mount the USB drive (often
fs0:). Typemap -rto see devices. - The Nuclear Option: If you are cross-flashing (e.g., turning a Dell H310 into a generic LSI 9211), you must erase the card first.
sas2flash.efi -o -e 6Then, flash the new firmware. Pro Tip: If you are using this card purely for a TrueNAS VM, do not flash the BIOS ROM (`mptsas2.rom`). Omitting the BIOS speeds up your host’s boot time because it skips the LSI initialization text at startup. It changes nothing for TrueNAS.
sas2flash.efi -o -f 2118it.bin4. Configuring the VM Architecture
Now that the hardware is prepped and the host is isolated, we build the vessel.
Machine Type: Q35 is King
When creating the VM in Proxmox, do not use the default “i440fx” machine type. That is a chipset from 1996. Use q35. It provides better native support for PCIe passthrough and handles IOMMU grouping more gracefully.
BIOS: OVMF (UEFI)
Select “OVMF (UEFI)” for the BIOS. This is mandatory if you want to use modern features like PCIe resource mapping. Note: This requires an “EFI Disk” to be added to the VM storage.
CPU Type: Host
Set the CPU type to “Host”. This passes your physical CPU instructions (like AES-NI for encryption and AVX for checksums) directly to TrueNAS. ZFS relies heavily on these instruction sets for performance.
Adding the PCI Device
Navigate to the VM’s Hardware tab > Add > PCI Device. You should see your LSI controller listed.
Important: Check “All Functions” (if the card has multiple controllers) and “ROM-Bar” (usually safe to leave checked, but if the VM hangs on boot, uncheck this).
5. “Day 2” Operations: Verification & Troubleshooting
You’ve booted TrueNAS. The drives are there. Are you done? Not yet.
The “Smart Test” Verification
We need to prove that TrueNAS has direct physical access. Open the TrueNAS Shell and run:
smartctl -a /dev/da0If you see the drive serial number, temperature, and a “PASSED” status, congratulations. You have achieved true passthrough. If you see “QEMU HARDDISK,” you failed start over.
The “Vanishing NIC” Phenomenon
Here’s a headache I ran into last month: I added the HBA card, and suddenly my Proxmox host lost network connectivity.
Why? Adding a PCIe device can shift the bus enumeration. Your network card, which was enp3s0, might suddenly become enp4s0 because the HBA took the #3 slot logically. If this happens, hook up a monitor and keyboard, edit /etc/network/interfaces, and update the interface name to match the new ip link output.
Conclusion
Building a hyperconverged server with Proxmox and TrueNAS is brilliant, but only if you respect the physics of the hardware. By using an LSI HBA in IT mode, actively cooling it, and correctly configuring the bootloader, you move from a “hobbyist experiment” to an “enterprise-grade implementation.”
Your data is worth more than a $30 counterfeit card and a lazily configured VM. Do it right, and this setup will outlast the drives you put in it.